
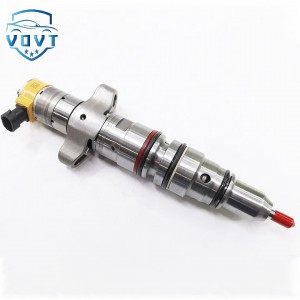
New High Quality Diesel Injector 328-2582 328-2585 328-2584 208-8067 20R-8059 For CAT C7


Products Description
| Reference. Codes | C7 |
| Application | C7 |
| MOQ | 4PCS |
| Certification | ISO9001 |
| Place of Origin | China |
| Packaging | Neutral packing |
| Quality Control | 100% tested before shipment |
| Lead time | 7~10 working days |
| Payment | T/T, L/C, Paypal, Western Union, MoneyGram or as your requirement |
How to clean the injector?
Non-disassembly cleaning
Required materials and tools: injector cleaner, special cleaner connection device, gloves, goggles and other protective equipment.
Operation steps
Disconnect the fuse or relay of the fuel pump to stop the fuel pump from working to release the pressure in the fuel system. You can find the location of the fuel pump fuse or relay by consulting the vehicle maintenance manual.
Find the fuel distribution pipe on the engine and connect the cleaner connection device to the fuel inlet on the fuel distribution pipe. Make sure the connection is firm to prevent the cleaner from leaking.
Pour the injector cleaner into the container of the cleaner connection device. The amount of cleaner can be determined according to the use of the vehicle and the degree of dirtiness of the injector, usually about one bottle.
Start the engine and let it idle. At this time, the cleaner will be delivered to the injector along with the fuel to clean the injector. During the cleaning process, the engine may shake or the speed may be unstable, which is normal because the cleaner will affect the combustion effect of the fuel.
Continue to idle the engine until the cleaner is completely used up. Then turn off the engine and wait for a few minutes to allow the cleaning agent in the injector to fully evaporate.
Reconnect the fuse or relay of the fuel pump to restore the normal operation of the fuel system. Start the engine and check whether the injector is working properly, whether the engine is running smoothly, whether there is any abnormal shaking or the fault light is on.
Disassembly and cleaning
Required materials and tools: injector cleaning agent, carburetor cleaning agent, ultrasonic cleaning machine, special tools (such as wrenches, screwdrivers, etc.), clean cloth or paper towels, protective equipment, etc.
Operation steps
First disconnect the negative terminal of the vehicle's battery to prevent short circuit or accidental engine starting during disassembly.
Follow the instructions in the vehicle maintenance manual to disassemble the injector step by step. It is usually necessary to remove the intake manifold before exposing the injector. During the disassembly process, pay attention to careful operation to avoid damaging surrounding components and pipes.
Place the removed injector on a clean workbench and spray the outside of the injector with carburetor cleaning agent to remove oil and carbon deposits on the surface. Then use special tools to disassemble the nozzle part of the injector, and be careful to keep the disassembled small parts to prevent loss.
Put the various parts of the injector into the ultrasonic cleaning machine, add an appropriate amount of injector cleaning agent, and clean according to the operating instructions of the cleaning machine. The cleaning time is generally 10-15 minutes, and the specific time can be adjusted appropriately according to the degree of dirtiness of the injector. The ultrasonic cleaning machine can effectively remove carbon deposits and dirt inside the injector through high-frequency vibration.
After cleaning, take the injector out of the cleaning machine and wipe it dry with a clean cloth or paper towel. Then use compressed air to blow dry the internal channels and spray holes of the injector to ensure that there is no residual cleaning agent or moisture.
Check whether the various parts of the injector are damaged or worn. If damaged, replace new parts in time. Then reassemble the injector, pay attention to the installation order and the installation position of the seal to ensure correct installation.
Install the cleaned and assembled injector back to the engine, and install it in the reverse order of disassembly. After installation, connect the negative pole of the battery, start the engine, and check whether the injector is working properly and whether there is any fuel leakage.
No matter which cleaning method you choose, after cleaning the injector, you should conduct a road test on the vehicle for a period of time to observe the working condition of the engine to ensure that the cleaning effect is good and the vehicle runs normally. At the same time, in order to maintain the good performance of the injector, it is recommended to clean the injector regularly, generally every 20,000 to 30,000 kilometers or once a year.
Products categories
-

New High Quality Diesel Injector 238-8091 241-3...
-

High Quality Diesel Fuel Injector 320D 326-4700...
-

High Quality Diesel Fuel Injector 236-0962 Comm...
-

Brand New Diesel Injector C18 For Cat Injector ...
-

Diesel Fuel Injector 456-3493 for Caterpillar C...
-
Diesel inyector Common Rail Fuel Injector 20R89...


